Introduction
This documentation refers to version 1.20 of the Five Minute Chat Unity Asset Package.
Five Minute Chat will likely be one of the quickest setups you’ve encountered.
Supported platforms & compatibility
Our Unity asset currently supports builds targeting Windows, Android, iOS and WebGL. More platforms will be coming down the line.
Third-party dependencies
The asset has two dependencies, one of which is a soft dependency and the other is fully optional.
TextMeshPro
- Available for free in the Package Manager under Unity Registry
- Required only when using one of the prefabs available in the asset
- If you do not want to use a prefab that uses TMP, you can remove it
- TMP is not a functional dependency for the Five Minute Chat functionality itself
- See the Unity TextMeshPro Documentation for more information
Signal R Best Http 2 - OPTIONAL
- This dependency is not required and only made available for convenience, for those that want it
- Used together with one of the two SignalR transport options.
- This options uses BestHTTP/2 as a dependency for SignalR transport (see the Preferred transport section below).
Demo scene
If you want to just play around with an example, have a look at the demo scene included in the package. The demo scene can be found in the FiveMinuteChat/Scenes folder.
Quickstart - Prefabs
If you want to try things out quickly in your own scene, take a look in the FiveMinuteChat/Prefabs folder. Here’s where you’ll find ready-made demonstrators.
Chat Quickstart - implement in your own scene
In order to get started quickly with Five Minute Chat, there are only three scripts that you’ll need to know about: ChatConnectionBehavior, ChatInputFieldBehavior and ChatLogBehavior.
- Add the Scripts/UI/Chat/ChatConnectionBehavior script to any object in your scene and click the “Request application id” button.
- Add the Scripts/UI/Chat/Simple/ChatLogBehavior script to any GameObject with a Text component on it. Drag and drop the ChatConnectionBehavior from step 1 onto the Connection field of this component. (there's also a "ChatBubbles" version but it has a bit more complexity behind it for styling purposes. Have a look at the TabbedChatWithMinimize prefab if you're interested in seeing how it's used)
- Add the Scripts/UI/Chat/ChatInputFieldBehavior script to any GameObject with an InputField component on it. Drag and drop the ChatConnectionBehavior from step 1 onto the Connection field of this component.
That’s it!
If you now start your game, you should see the log reporting that a connection has been successfully made. Write something in your input field and press enter (or change focus). The message will be sent to the cloud service and come back again immediately, getting printed on the text field.
Congratulations! You have now added online chat functionality to your game!
Support Tickets Quickstart - implement in your own scene
In order to get started quickly with the Support Ticket feature of Five Minute Chat, there are only two scripts that you’ll need to know about: SupportConnectionBehavior and SupportLogBehavior.
- Add the Scripts/UT/SupportRequests/SupportConnectionBehavior script to any object in your scene and click the “Request application id” button (unless you don't already have one)
- Make a copy of the Scripts/UT/SupportRequests/SupportLogBehavior script and attach it to a GameObject where you wish to your log to appear. Modify the lookups in the
Awake()method of the script to match your setup. It needs an input field where you write your messages, and a button to hit when you want to send the message. It also needs a text field where the log will be printed, which is assumed to be a ScrollRect. In the demo prefab, it is the same object that the script is attached to. The script also has a reference to a prefab used to display each message in the same way as the ChatLogBehavior script in the Chat Quickstart example above.
Since setting up a support ticket session is a bit more involved than just connecting to a chat, we have provided a prefab that you can use to get started quickly. It can be found in the FiveMinuteChat/Prefabs folder and is called SupportRequests. You can use this as a basis for how to roll your own, or just use it as-is with a bit of re-styling.
Building for WebGL
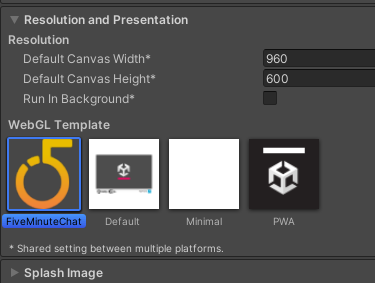
When targeting WebGL, you'll need to do a few extra steps in order to get things working. The assets comes with a default, barebones template in that will automatically be installed in the Assets/WebGLTemplates folder when you import the package. In order to use our packages for WebGL builds, you'll either need to include a few things from it or use it directly to build on. Go to Edit > Project Settings > Player and select the WebGL tab. In the Resolution and Presentation section, set the WebGL Template to FiveMinuteChat.

The plumbing is composed of the following parts:
- SignalR client library - You'll find an include in the index.html of the template, pulling the library from Microsoft's public CDN endpoint at Cloudlfare. If you have other requirements and want to include it instead, you can put the library in your project and reference it locally in your build instead.
- Scripts/FiveMinuteChat.jslib - This is a JavaScript library that is used to communicate with the browser. It is automatically included in your build when using the FiveMinuteChat WebGL template and acts as a bridge between the SignalR client and the application
- Scripts/Helpers/WebGLCallbackListener.cs - This is a C# script that is used to receive callbacks from the JavaScript library. It is automatically included in your build when using the FiveMinuteChat WebGL template. It is quite simple and only works as a filter for API backwards compatability (JSON payloads) beyond passing messages on.
Detailed description
Script: ChatConnectionBehavior & SupportConnectionBehavior
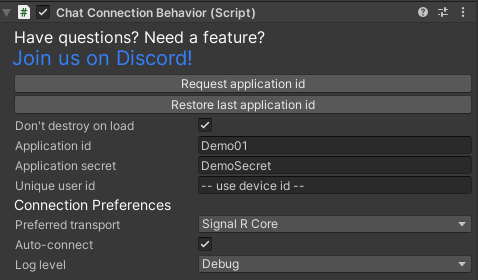
The first thing you’ll need to do is attach the ChatConnectionBehavior/SupportConnectionBehavior to any object in your scene. They both inherit from a common base ConnectionBehaviorBase, which also has its editor component bound to it. The components look something like this in the inspector:

The only thing that may differ from what you're seeing here is the Preferred transport option, if you're running WebGL, as it will then be hidden. See the "Preferred transport" section below for more information.
Fields
Join us on Discord!
A link pointing to an invitation to our Discord server
Request application id
This button sends a request to our cloud asking for a unique application id and associated secret. The returned data will be automatically filled in.
Please note that the behavior will not allow a new application id to be requested within a 24 hour period, once one has been successfully received. In any case, there’s no real need to do this more than once unless you’ve lost your credentials.
Restore last application id
Whenever a new application is successfully requested, it gets saved in your EditorPrefs. In case you lose it for some reason, you can read it back from your EditorPrefs by clicking this button.
Since a new application id cannot be requested within a 24 hour period, this will help you if you’ve lost what you received.
Don’t destroy on load
Make sure to set the “Don’t destroy on load” checkbox according to your needs. If you want to preserve the connection with our servers during scene loads, this box should be checked. If, on the other hand, you intend to disconnect the chat and reconnect at a later time, destroying the object is fine.
Application id
The value in this field is unique to your game. It is how your game identifies itself with our cloud services, making sure chat messages are routed correctly. You can think of this as a username for your specific game.
The default value, “Demo01”, is a special id which anyone can use to just try things out with. There is also a “Demo02”.
Application secret
Alongside the Application Id value comes a secret, which is used to authenticate the game with our cloud services. You can think of this as the password used with a username.
The default value, “DemoSecret”, is the secret used together with “Demo01” and “Demo02”.
Unique user id
In order to keep messages from different players apart, they need to be identified by a unique id. This is that id. If you do not fill a value into this field, the default is to use the built-in Unity device id instead (SystemInfo.deviceUniqueIdentifier)
Preferred transport
Select your preferred transport protocol.
Available options are:
Tcp - Uses long-running, raw TCP sockets for communication with the server backends.
Signal R Core (default) - Establishes a SignalR connection with the server backends. This options uses standard SignalR (Core) libraries from Microsoft. Also note that this is the only option available when building for WebGL, so the
Preferred optionfield will be hidden in that case.Signal R Best Http 2 - Establishes a SignalR connection with the server backends. This options uses BestHTTP/2 as a dependency for SignalR transport. If you have this asset in your project already, it may offer some benefits over standard Microsoft libraries, such as support for AOT platforms when building with IL2CPP. In order to activate BestHTTP/2 support, add FiveMinuteChat_BestHttpEnabled as a custom define directive to your Unity Project. See "Platform custom #defines" in the official Unity documentation for more information on how to do this.
Auto-connect
Checking the box enables the behavior to connect to our cloud services immediately upon startup. If you do not want this behavior, and instead what to connect through code, uncheck this box. See API below for scripted connection.
Log level
Defines the minimum log level that will be output by the asset. Use this setting to keep noise down in your logs.
Script API
Connect()
Used when the Auto-reconnect value is false. This will trigger a server lookup followed by a connection to the cloud service being initialized.
Disconnect()
Calling this method will close an active connection.
SetUsername( string username )
This is where you set the username visible to other players as chat messages are sent. The username does not have to be set before connecting to the cloud service, but it is advisable to do so. Any chat messages that are sent before the username is initially set will be sent as “ANONYMOUS-VWXYZ”.
SendChatMessage( string message, string channelName )
Here’s how you send chat messages. The message can be any string except for an empty of null one (this will throw an exception).
There are also two commands supported at this time, sent in the message parameter:
- /join <channel_name> - Sends a request to the server asking to join a channel
- /leave <channel_name> - Sends a request to the server asking to leave a channel
- /nick <user_name> - Sends a request to the server asking to change username
CreateChannel( string channelName )
Attempts to create a channel by name channelName. The parameter is optional and can be left null or empty, in which case a random channel name will be generated. The response from the server contains success status and the name of the channel.
JoinChannel( string channelName )
Attempts to join a channel by name channelName. Failure will have no adverse side effects. The response from the server contains success status and the name of the channel.
LeaveChannel( string channelName )
Attempts to leave a channel by name channelName. Failure (such as if the player is not a member of the given channel) will have no adverse side effects. The response from the server contains success status and the name of the channel.
GetChannelInfo( string channelName )
Retrieves information about a channel by name channelName. The response from the server contains channel users and the name of the channel.
Whisper( string recipientDisplayId, string message )
Sends a whisper to a user with the given display name recipientDisplayId.
Whois( string recipientDisplayId )
Retrieves information about a user with the given display name recipientDisplayId. The response from the server the users Name and Display Id.
Script: ChatInputFieldBehavior
The component looks like this in the inspector:

This is a script provided as-is for convenience and developers are encouraged to use it as a starting point if custom input behaviors are required. Attach it to a GameObject with a InputField component attached and it will send messages via the Chat Connection Behavior whenever the onEndEdit event is triggered.
Connection
This field should hold a reference to the Chat Connection Behavior you’re using to connect to the cloud service. If none is given, the script will attempt to find one in a parent of the GameObject.
Script: ChatLogBehavior
The component looks like this in the inspector:

This is a script provided as-is for convenience and developers are encouraged to use it as a starting point if custom chat log behaviors are required. Attach it to a GameObject with a Text component attached and it will receive messages from the Chat Connection Behavior, and display them, given the channel name matches.
Connection
This field should hold a reference to the Chat Connection Behavior you’re using to connect to the cloud service. If none is given, the script will attempt to find one in a parent of the GameObject.
Channel Name
All messages sent through the service must target a channel. The default channel name is “Global”. Messages coming from other channels than the one given in this field will not be added to the Text field.
This value can be changed at runtime without adverse side-effects.
Script: TabbedChatBehavior
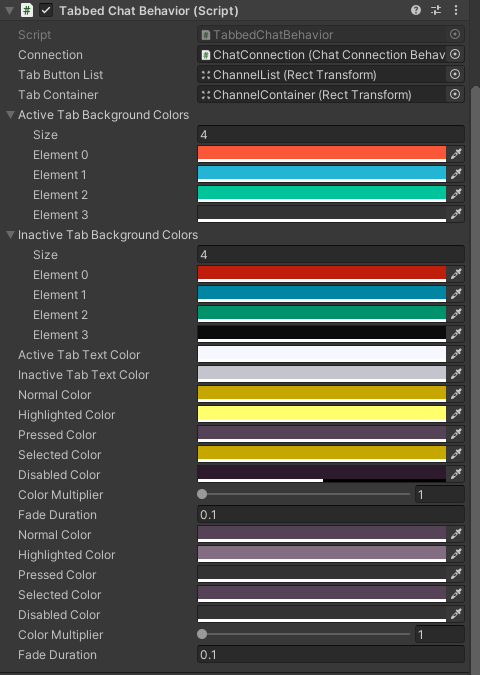
The component looks like this in the inspector:

This is a script provided as-is for convenience and developers are encouraged to use it as a starting point if custom chat log behaviors are required.
The script is used by the TabbedChat prefab and demonstrates how to make a simple chat dialog that populates dynamically with channels as they are joined/left by the user. It is not intended to be used in your game without modification, as every game has its own set of requirements on styling, behavior and so on.
Connection
This field should hold a reference to the Chat Connection Behavior you’re using to connect to the cloud service. If none is given, the script will attempt to find one in a parent of the GameObject.
Tab Button List
Reference to a GameObject that acts as a container for tabs selection buttons. The script will use the first child of this container as a template for tabs as channels are populated.
Tab Container
Reference to a GameObject that acts as a container for tabs with chat logs. The script will use the first child of this container as a template for tabs as channels are populated.
The rest of the properties on the script are used to style the chat with different colors. This documentation will leave that as an exercise for the reader.
Next Steps
Once you’ve done your proof of concept, you’ll most likely want to have a look at the code in ChatInputFieldBehavior and ChatLogBehavior. A common customization would be to modify how channels are handled, how the chat log is displayed (scrolling, custom layouts, etc.) and how the user should interact with the chat itself. Looking into these scripts is a good starting point for any customization. Otherwise, read on below for more info about the simple script API we supply.
